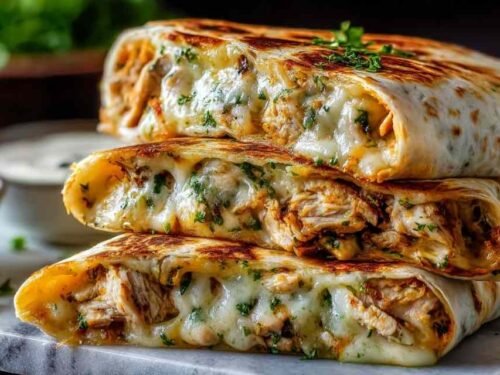
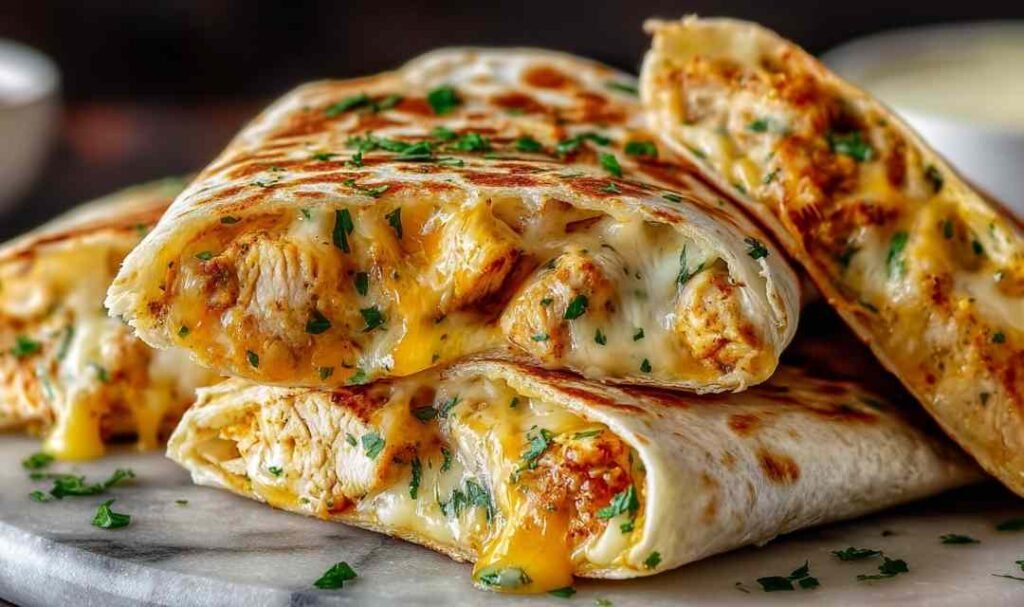
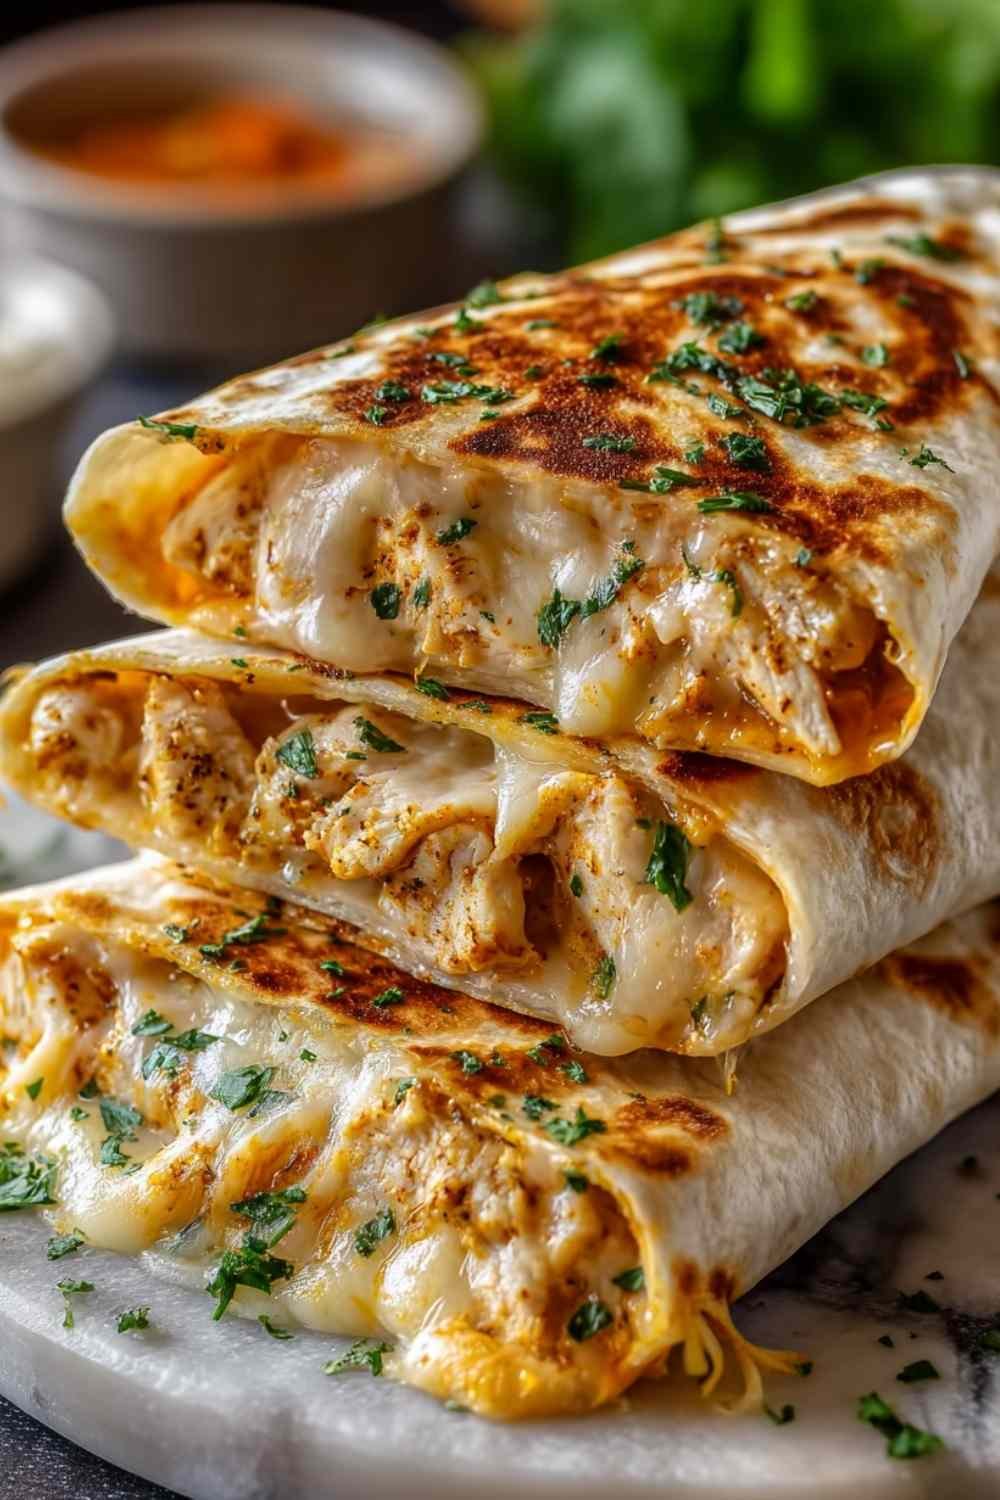
Cheesy Garlic Chicken Wraps are packed with three melted cheeses, tender chicken, and bold garlic flavor wrapped in a crispy golden tortilla. They’re ready in about 25 minutes using simple ingredients, making them perfect for busy weeknights when you need something satisfying fast.
Table of Contents
Ingredients for Cheesy Garlic Chicken Wraps
I always keep rotisserie chicken on hand because it makes recipes like this incredibly easy. My go-to is grabbing one from the deli section on my way home, but any cooked chicken works beautifully. The real magic happens when you combine three types of cheese for that irresistible creamy texture.
- 2 cups cooked shredded or chopped chicken
- 1 teaspoon garlic powder
- 1/2 teaspoon onion powder
- Salt and black pepper, to taste
- 1 1/2 cups shredded mozzarella cheese – I recommend using freshly shredded for better melting
- 1/2 cup shredded cheddar cheese
- 1/4 cup softened cream cheese – My preference is to let it sit at room temperature for 15 minutes
- 2 tablespoons mayonnaise
- 2 tablespoons chopped fresh parsley or 1 teaspoon dried
- 4 large flour tortillas – In my experience, burrito-size tortillas work best for easier wrapping
- 2 tablespoons melted butter
- 1 teaspoon minced garlic – I usually use fresh rather than jarred for bolder flavor
- Optional: Baby spinach, shredded lettuce, or sliced tomatoes
Step-by-Step Instructions
In my experience, warming the tortillas for 10 to 15 seconds in the microwave before filling makes them more pliable and prevents tearing. Mixing the filling thoroughly ensures every bite has balanced flavor.
Step 1: In a mixing bowl, combine the shredded chicken, garlic powder, onion powder, salt, pepper, mozzarella, cheddar, softened cream cheese, mayonnaise, and parsley. Mix with a spatula until everything is creamy and well combined. The cream cheese should be fully incorporated with no lumps remaining.
Step 2: Warm your tortillas briefly in the microwave, then place them on a clean flat surface. Spoon about one quarter of the chicken and cheese filling into the center of each tortilla, spreading it in a horizontal line across the middle. This makes folding easier. If adding vegetables like spinach or tomatoes, layer them on top of the filling now. Pro tip: don’t overfill or the wraps will be difficult to seal.
Step 3: Fold the left and right sides of each tortilla inward over the filling, then fold the bottom edge up and roll tightly toward the top to create a secure wrap. The seam is where the tortilla overlaps at the end of the roll. Keep tension as you roll so the filling stays compact.
Step 4: In a small bowl, mix the melted butter with minced garlic. Using a pastry brush, generously coat the outside of each wrap with this garlic butter mixture. This step is what creates that golden, crispy exterior.
Step 5: Heat a large skillet over medium heat. Place each wrap seam-side down (with the overlapped edge on the bottom) in the pan and cook for 2 to 3 minutes until golden brown and crisp. You can cook 2 wraps at a time in a 12-inch skillet. Flip carefully and toast the other side for another 2 to 3 minutes. The tortilla should be beautifully golden and you’ll see cheese starting to ooze slightly at the edges when it’s fully melted inside. Watch closely to avoid burning. Slice each wrap in half diagonally and serve warm.
Perfect Pairings for Cheesy Garlic Chicken Wraps
These wraps pair wonderfully with sides that balance the rich, cheesy filling with fresh flavors and contrasting textures.
Caesar Salad: The crisp romaine and tangy dressing cut through the richness of the cheese while adding freshness to your plate. The garlic notes in Caesar dressing complement the garlic butter on the wraps perfectly.
Sweet Potato Fries: These add a touch of natural sweetness and a satisfying crunch that contrasts beautifully with the soft, creamy wrap filling. Try our maple glazed chicken with sweet potatoes for another sweet potato pairing idea. Plus, they’re packed with vitamins and fiber.
Cucumber Tomato Salad: Light, refreshing, and quick to toss together, this simple side brings acidity and crunch that balance the heavy cheese and protein. It’s especially perfect during warmer months.
Creamy Tomato Soup: For a comforting meal, serve these wraps alongside a bowl of warm tomato soup for dipping. The combination feels like an elevated grilled cheese experience that both kids and adults love.
Seasoned Roasted Vegetables: Zucchini, bell peppers, or broccoli roasted with olive oil and herbs add nutrition and color while keeping the meal well-rounded and satisfying. Our chicken with mixed vegetable stir fry shows how well chicken pairs with roasted veggies.

Storing and Reheating Your Wraps
Let cooked wraps cool completely before wrapping each one individually in aluminum foil or placing them in airtight containers. Store in the refrigerator for up to three days. I recommend separating them with parchment paper if stacking to prevent sticking.
For reheating, skip the microwave as it makes the tortilla soggy. Instead, warm wraps in a skillet over medium heat for five to seven minutes, flipping once, until heated through and crispy again. You can also reheat in a 350°F oven for about ten minutes. Pro tip: brush with a bit more garlic butter before reheating for extra flavor.
These wraps are incredibly versatile for meal prep. You can prepare the filling up to two days ahead and store it separately, then assemble and toast fresh when you’re ready to eat. For freezing, wrap the untoasted assembled wraps tightly in plastic wrap and foil, then freeze for up to one month. Thaw overnight in the fridge before toasting. If you enjoy make-ahead meals, check out our baked cream cheese chicken taquitos for another freezer-friendly option.
FAQs
Can I use a different type of cheese?
Absolutely! While the combination of mozzarella, cheddar, and cream cheese works beautifully, you can substitute with Monterey Jack, pepper jack for heat, or even Swiss. Just keep the cream cheese as it provides essential creaminess.
How do I prevent my tortillas from tearing?
Warm your tortillas slightly in the microwave for 10 to 15 seconds before filling. This makes them more pliable and less likely to crack. Also, make sure your cream cheese is fully softened so the filling spreads smoothly.
Can I make these ahead for a party?
Yes! Prepare the wraps completely, toast them, then keep warm in a 200°F oven for up to 30 minutes. Alternatively, assemble them ahead and toast just before serving for the best crispy texture.
Cheesy Garlic Chicken Wraps
Ingredients
Equipment
Method
- Warm your tortillas briefly in the microwave for 10 to 15 seconds to make them pliable and prevent tearing during folding.
- In a mixing bowl, combine the shredded chicken, garlic powder, onion powder, salt, pepper, mozzarella, cheddar, softened cream cheese, mayonnaise, and parsley. Mix with a spatula until everything is creamy and well combined, ensuring the cream cheese is fully incorporated with no lumps.
- Place warmed tortillas on a clean flat surface. Spoon about one quarter of the chicken and cheese filling into the center of each tortilla, spreading it in a horizontal line across the middle to make folding easier. Add optional vegetables like spinach or tomatoes if desired. Avoid overfilling to ensure easy sealing.
- Fold the left and right sides of each tortilla inward over the filling, then fold the bottom edge up and roll tightly toward the top to create a secure wrap. The seam is where the tortilla overlaps at the end. Keep tension while rolling so the filling stays compact.
- In a small bowl, mix the melted butter with minced garlic. Using a pastry brush, generously coat the outside of each wrap with this garlic butter mixture.
- Heat a large skillet over medium heat. Place each wrap seam-side down (with the overlapped edge on the bottom) in the pan and cook for 2 to 3 minutes until golden brown and crisp. You can cook 2 wraps at a time in a 12-inch skillet. Flip carefully and toast the other side for another 2 to 3 minutes until the tortilla is golden and cheese starts oozing slightly at the edges, indicating it’s fully melted inside. Watch closely to avoid burning. Slice each wrap in half diagonally and serve warm.