I still remember the first time I made Mongolian Ground Beef Noodles on a busy Wednesday evening. My kids were starving, I had about 30 minutes before bedtime chaos, and I needed something that would actually get them excited. This dish became an instant family favorite, and I’ve been making it at least twice a month ever since.
Table of Contents
Ingredients for Mongolian Ground Beef Noodles
I’ve made this recipe dozens of times, and I’ve learned that quality ingredients really do make a difference here. I always use lean ground beef (85/15 works perfectly) because it gives you great flavor without leaving your dish swimming in grease. My go-to is fresh garlic over jarred because the aroma when it hits that hot pan is absolutely worth the extra minute of prep time.
- 1 lb ground beef (85% lean recommended)
- 5 cloves garlic, minced (fresh is best – I always keep a bulb on hand)
- 1/3 cup brown sugar (light or dark both work great)
- 1/4 cup beef broth (low sodium gives you better control)
- 1/3 cup soy sauce (I recommend low sodium to avoid oversalting)
- 3 tablespoons hoisin sauce (this adds incredible depth)
- 1/2 teaspoon ground ginger
- 1/2 teaspoon ground black pepper (freshly ground if possible)
- 1/4 teaspoon red pepper flakes (optional, but my family loves a little kick)
- 10 oz linguine (you can substitute with spaghetti or fettuccine)
- 1 tablespoon cornstarch (essential for that glossy, thick sauce)
- 2 tablespoons water (for the cornstarch slurry)
- 4 green onions, sliced (I use both white and green parts for garnish)
Step-by-Step Instructions
In my experience, having everything prepped before you start cooking makes this recipe come together seamlessly. The sauce thickens quickly, so you’ll want your pasta already cooked and ready to toss in.
Step 1: Bring a large pot of salted water to a boil and cook the linguine according to package directions until al dente, usually 8-10 minutes. Drain in a colander and set aside without rinsing; the starch helps the sauce cling better. Start browning your beef while the pasta finishes cooking to save time.
Step 2: Heat a large 12-inch skillet over medium heat. Add the ground beef, breaking it apart with a wooden spoon. Cook for 5-7 minutes until the beef is completely browned with no pink remaining. You’ll know it’s ready when you see nice caramelization on the meat. Drain any excess fat by carefully tilting the pan and spooning it out.
Step 3: Add the minced garlic to the browned beef and cook for about 1 minute, stirring constantly. Watch carefully here because garlic can burn quickly and turn bitter. You want it fragrant and just starting to turn golden.
Step 4: Stir in the brown sugar, beef broth, soy sauce, hoisin sauce, ground ginger, black pepper, and red pepper flakes if using. Mix everything together thoroughly, scraping up any flavorful bits stuck to the bottom of the pan. Let this simmer for 2 minutes so the flavors can blend.
Step 5: In a small bowl, whisk together the cornstarch and water until completely smooth with no lumps. Pour this slurry into the skillet and stir continuously for 2-3 minutes. The sauce will transform from thin to beautifully thick and glossy, coating the back of your spoon. You’ll know it’s ready when it leaves a trail on the spoon when you run your finger through it.
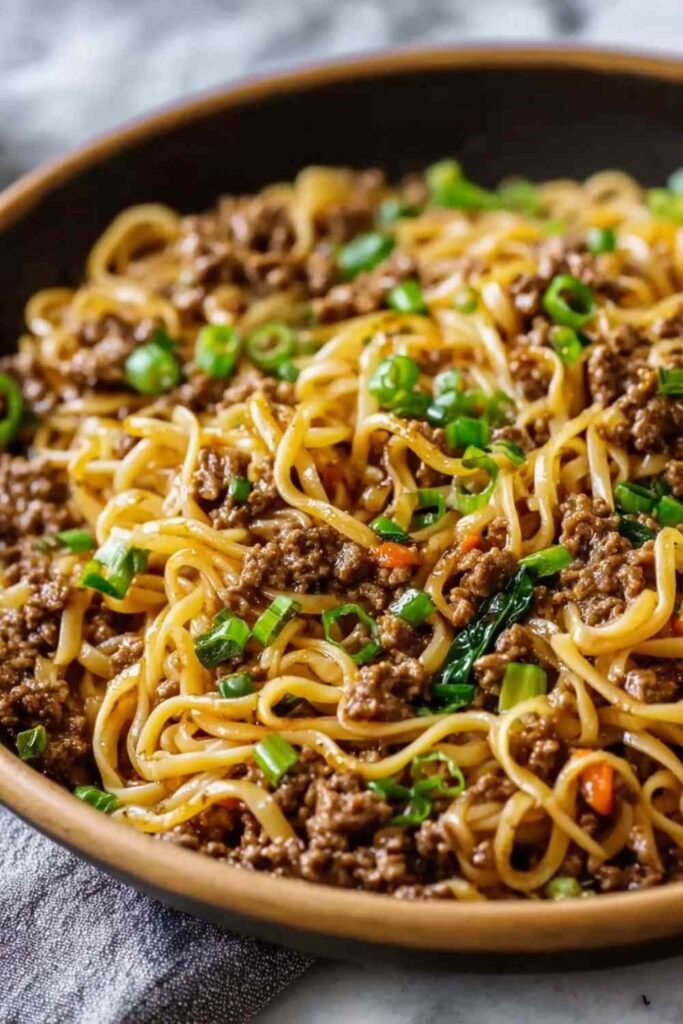
Step 6: Add the cooked linguine directly to the skillet and use tongs to toss everything together until every strand is coated in that gorgeous sauce. This takes about 1-2 minutes of good tossing. Garnish generously with sliced green onions and serve immediately while it’s piping hot.
Perfect Pairings for Mongolian Ground Beef Noodles
This dish is hearty and satisfying on its own, but pairing it with the right sides creates a complete, balanced meal that adds color and nutrition to your dinner table.
Stir-Fried Broccoli: The slight bitterness and crunch of broccoli cuts through the richness of the noodles perfectly. A quick vegetable stir-fry adds vibrant color and keeps things light alongside these savory noodles.
Asian Cucumber Salad: A cool, refreshing cucumber salad with rice vinegar and sesame seeds provides a crisp contrast to the warm, saucy noodles. The acidity helps balance the sweetness in the dish and cleanses your palate between bites.
Steamed Edamame: These protein-packed pods add nutritional value and a pop of green to your plate. Just sprinkle with a little sea salt, and they’re ready to go. My kids love popping them out of the shells while dinner finishes up.
Garlic Butter Chicken Noodles: If you love these noodles, try this garlic-forward variation with chicken for another quick weeknight option with similar Asian-inspired flavors.
Sesame Snap Peas: Lightly sautéed snap peas with toasted sesame seeds bring sweetness and crunch. They cook in just 3-4 minutes and add beautiful color to the plate.
Storage & Serving Tips
Store any leftovers in an airtight container in the refrigerator for up to 3 days. I usually portion them into individual containers for easy grab-and-go lunches. The flavors actually deepen overnight, making leftovers just as delicious as the first serving.
For reheating, I recommend using the stovetop with a splash of water or beef broth to loosen the sauce, stirring over medium heat for 3-4 minutes until heated through to 165°F. The microwave works too – just heat in 1-minute intervals, stirring between each session to ensure even warming. Pro tip: add a few drops of water before microwaving to prevent the noodles from drying out.
This dish is incredibly versatile and adapts well to different serving styles. Serve it in bowls topped with extra green onions and sesame seeds for a restaurant-style presentation, or pack it in lunch containers with some steamed vegetables on the side. You can also bulk it up with additional veggies like bell peppers, snap peas, or mushrooms stirred in during the last few minutes of cooking. For more quick noodle inspiration, try our Thai Drunken Noodles or Sticky Garlic Chicken Noodles for different flavor profiles.
FAQs
Can I use a different type of meat?
Absolutely! Ground turkey or ground chicken work beautifully as leaner alternatives. You can also use ground pork for a richer flavor. Just adjust the cooking time slightly since poultry cooks faster than beef.
How can I make this gluten-free?
Use gluten-free pasta (rice noodles work wonderfully) and substitute the soy sauce with tamari or coconut aminos. Make sure your hoisin sauce is also certified gluten-free, as some brands contain wheat.
Can I make this spicier?
Yes! Add more red pepper flakes, a drizzle of sriracha, or sliced fresh chilies when you add the garlic. You can also serve it with chili oil on the side so everyone can adjust the heat to their preference.

Mongolian Ground Beef Noodles
Ingredients
Equipment
Method
- Bring a large pot of salted water to a boil and cook the linguine according to package directions until al dente, usually 8-10 minutes. Drain in a colander and set aside without rinsing; the starch helps the sauce cling better. Start browning your beef while the pasta finishes cooking to save time.
- Heat a large 12-inch skillet over medium heat. Add the ground beef, breaking it apart with a wooden spoon. Cook for 5-7 minutes until the beef is completely browned with no pink remaining. Drain any excess fat by carefully tilting the pan and spooning it out.
- Add the minced garlic to the browned beef and cook for about 1 minute, stirring constantly until fragrant and just starting to turn golden. Watch carefully to prevent burning.
- Stir in the brown sugar, beef broth, soy sauce, hoisin sauce, ground ginger, black pepper, and red pepper flakes if using. Mix everything together thoroughly, scraping up any flavorful bits stuck to the bottom of the pan. Let this simmer for 2 minutes so the flavors can blend.
- In a small bowl, whisk together the cornstarch and water until completely smooth with no lumps. Pour this slurry into the skillet and stir continuously for 2-3 minutes until the sauce thickens and becomes glossy, coating the back of your spoon.
- Add the cooked linguine directly to the skillet and use tongs to toss everything together until every strand is coated in the sauce, about 1-2 minutes. Garnish generously with sliced green onions and serve immediately while hot.
Notes