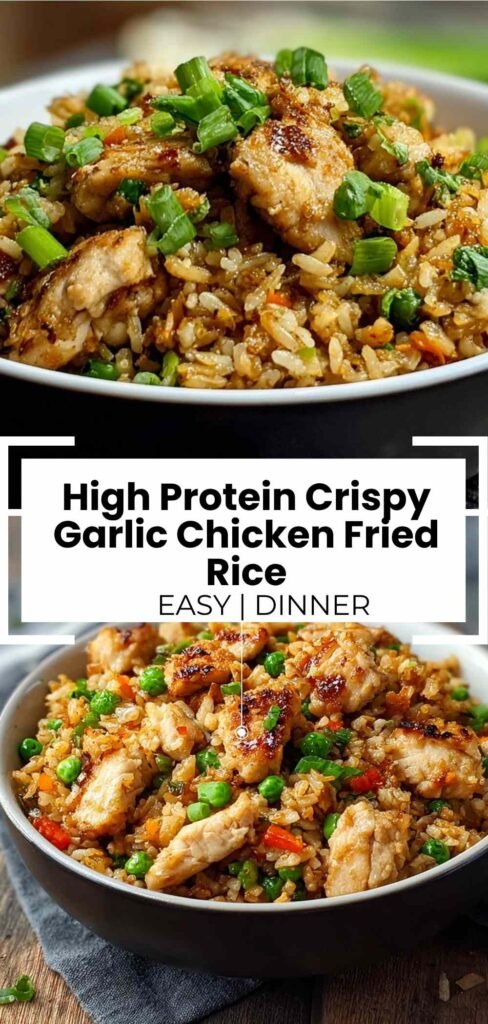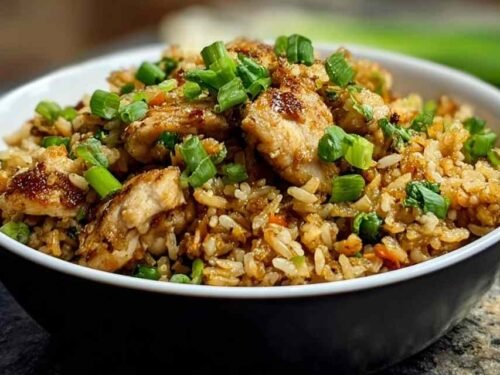
There’s something magical about a dish that delivers restaurant-quality flavor without the fuss. High protein crispy garlic chicken fried rice is one of those recipes that checks every box: it’s quick, satisfying, and packed with 38 grams of protein per serving. I discovered this recipe on a Tuesday night last spring when I had leftover rice and needed something fast but didn’t want to compromise on taste or nutrition.
Table of Contents
Ingredients for High Protein Crispy Garlic Chicken Fried Rice
I’ve tested this recipe countless times to get the proportions just right. The key is having everything prepped before you start cooking since this comes together quickly once you hit the stove. My preference is always using day-old rice because it fries up perfectly without getting mushy.
- 2 cups cooked jasmine or basmati rice (preferably day-old, stored uncovered in the fridge)
- 1 lb boneless, skinless chicken breast, cut into 1-inch pieces – Pro tip: cut against the grain for the most tender bites
- 4 cloves garlic, minced – I recommend using fresh garlic rather than jarred for the best flavor
- 2 tablespoons olive oil or sesame oil – In my experience, sesame oil adds an authentic restaurant taste
- 1 cup frozen peas and carrots, thawed
- 3 green onions, sliced
- 2 large eggs, lightly beaten
- 3 tablespoons low-sodium soy sauce – My go-to is always low-sodium so I can control the salt level
- 1 tablespoon oyster sauce (optional but recommended) – I always include this for depth of umami flavor
- 1/2 teaspoon ground black pepper
- 1 teaspoon cornstarch (for chicken coating) – This is what creates that crispy texture
Step-by-Step Instructions
I recommend having all your ingredients prepped and ready before you start cooking. This dish moves quickly, and you don’t want to be chopping garlic while your chicken overcooks.
Step 1: Toss the chicken pieces with cornstarch until they’re completely coated. This creates a light, crispy crust when the chicken hits the hot pan. Let it sit for a minute while you heat your pan.
Step 2: Heat 1 tablespoon of oil in a large 12-inch skillet or wok over medium-high heat until it shimmers. Add the chicken in a single layer and resist the urge to move it around. Let it cook undisturbed for about 3 to 4 minutes, then flip and cook another 3 to 4 minutes until golden brown and crispy. The internal temperature should reach 165°F. Remove and set aside.
Step 3: Add the remaining tablespoon of oil to the same pan. Toss in the minced garlic and let it sizzle for about 30 seconds until fragrant and lightly golden. Watch it closely because garlic can burn quickly and turn bitter.
Step 4: Push the garlic to one side of the pan and pour in the beaten eggs. Scramble gently until they form soft, fluffy curds, about 1 to 2 minutes.
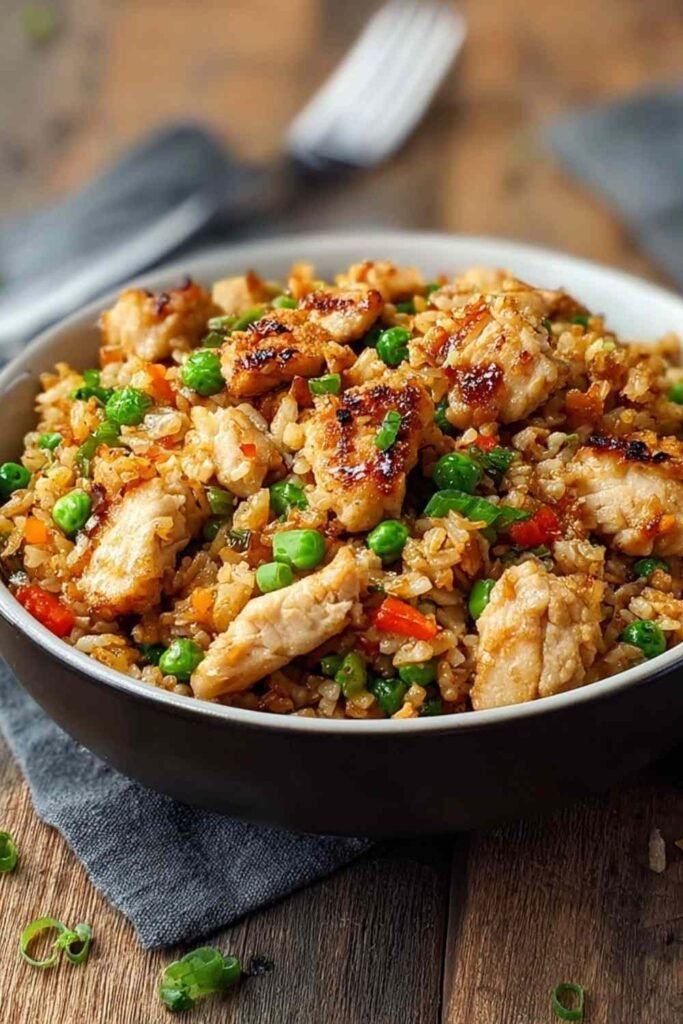
Step 5: Add the day-old rice, breaking up any clumps with your spatula. Stir-fry for 2 to 3 minutes, then add the peas, carrots, and green onions. Drizzle in the soy sauce and oyster sauce, tossing everything together until the rice is evenly coated and heated through.
Step 6: Return the crispy chicken to the pan and give everything a final toss. Sprinkle with black pepper, taste and adjust seasoning if needed, then serve immediately while the chicken is still crunchy.
Perfect Pairings for This Fried Rice
This high protein dish is hearty enough to stand alone, but pairing it with complementary sides creates a complete, balanced meal.
Steamed Edamame: The mild, slightly sweet flavor of edamame adds extra plant-based protein and a pop of green color to your plate. It also provides a cooling contrast to the warm, savory rice.
Asian Cucumber Salad: A crisp, tangy cucumber salad with rice vinegar and sesame seeds cuts through the richness of the fried rice and adds a refreshing crunch. The acidity balances the savory, umami-heavy main dish perfectly.
Chicken with Mixed Vegetable Stir Fry: If you’re feeding a crowd or want extra vegetables, this colorful stir fry makes an excellent companion dish with similar Asian flavors.
Miso Soup: A light, warm miso soup with tofu and scallions makes this feel like a complete restaurant experience. It’s comforting without being heavy, and the probiotics in miso support digestion.
Street Corn Chicken Rice Bowl: For another high-protein rice bowl option with Mexican flavors, try this street corn variation that’s equally quick and satisfying.
Chinese Beef and Broccoli: Serve alongside this classic takeout favorite for an impressive Asian feast that comes together in minutes.
Keeping It Fresh and Delicious
Store any leftovers in an airtight container in the refrigerator for up to 4 days. The chicken may lose some of its crispiness during storage, but the flavors actually deepen overnight as everything melds together.
For reheating, I recommend using a skillet over medium heat with a small splash of oil rather than the microwave. This helps restore some of the crispy texture to the chicken and prevents the rice from drying out. Heat for 3 to 5 minutes, stirring occasionally, until warmed through.
This recipe is incredibly versatile. Swap the chicken for shrimp, tofu, or leftover rotisserie chicken. Try different vegetables like bell peppers, broccoli, or snap peas based on what you have on hand. For more chicken and rice inspiration, check out our Creamy Smothered Chicken and Rice or Salsa Verde Chicken Rice Skillet. You can even make it spicy by adding sriracha or red pepper flakes.
FAQs
Can I use fresh rice instead of day-old rice?
While day-old rice works best because it’s drier and fries up without clumping, you can use fresh rice in a pinch. Spread it on a baking sheet and let it cool completely in the refrigerator for 30 minutes before using, which helps remove excess moisture.
How do I keep the chicken crispy after adding it back to the rice?
The key is adding the chicken at the very end and avoiding over-stirring. Toss it gently just to combine, then serve immediately. The cornstarch coating helps maintain crispiness even when mixed with the sauce.
Can I make this gluten-free?
Absolutely. Use tamari instead of regular soy sauce, and check that your oyster sauce is gluten-free (or substitute with additional tamari and a touch of sugar). The rest of the ingredients are naturally gluten-free.

High Protein Crispy Garlic Chicken Fried Rice
Ingredients
Equipment
Method
- Toss the chicken pieces with cornstarch until evenly coated. This creates the crispy texture when pan-fried. Let sit for 1 minute.
- Heat 1 tablespoon of oil in a large 12-inch skillet or wok over medium-high heat until shimmering. Add the chicken in a single layer and cook undisturbed for 3 to 4 minutes, then flip and cook another 3 to 4 minutes until golden and crispy. Internal temperature should reach 165°F. Remove and set aside.
- In the same pan, add the remaining tablespoon of oil. Toss in the minced garlic and let it sizzle for about 30 seconds until fragrant and lightly golden. Be careful not to let it burn.
- Push the garlic to the side and pour in the beaten eggs. Scramble gently until they form soft, fluffy curds, about 1 to 2 minutes.
- Add the cooked rice, breaking up clumps with your spatula. Stir-fry for 2 to 3 minutes, then add the peas, carrots, and green onions. Drizzle in the soy sauce and oyster sauce. Toss everything together until the rice is evenly coated and heated through.
- Add the crispy chicken back into the pan. Give everything a final gentle toss, ensuring the chicken stays crunchy. Sprinkle with black pepper, adjust seasoning if needed, and serve hot immediately.
Notes