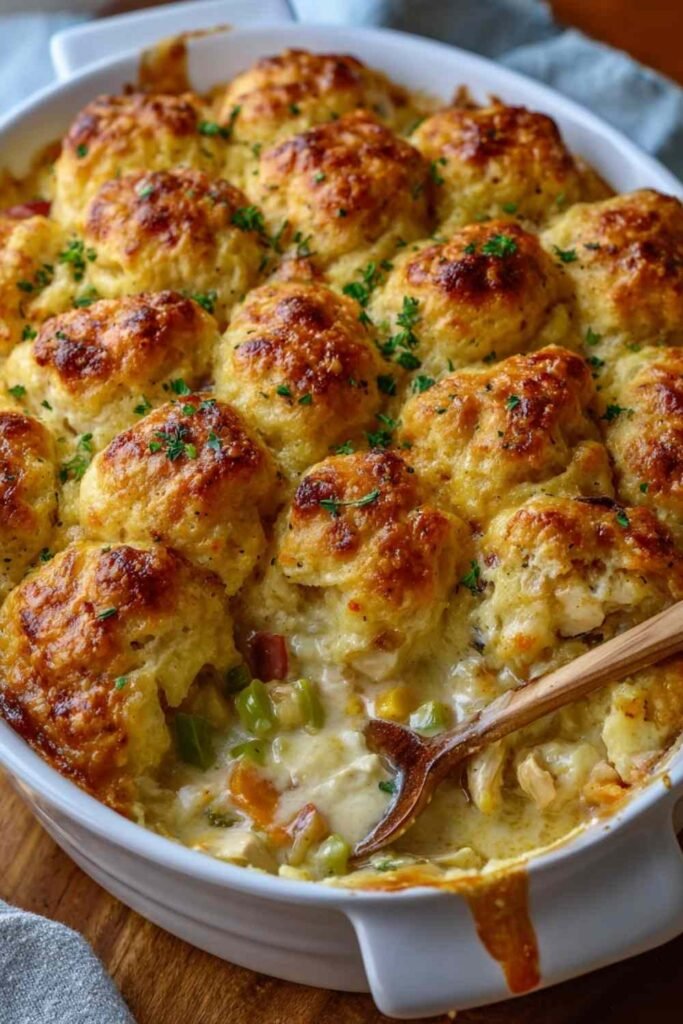
This comfort food staple has saved dinner more times than I can count on busy weeknights. Chicken Bubble Biscuit Bake Casserole combines tender chicken, fluffy biscuits, and a creamy sauce in one dish that brings everyone to the table with smiles. It’s that magical recipe where everything bakes together and somehow tastes even better than the sum of its parts.
Table of Contents
Ingredients for Chicken Bubble Biscuit Bake Casserole
I’ve made this casserole countless times, and the ingredient list is wonderfully flexible. I always use rotisserie chicken because it cuts prep time in half and adds extra flavor from the seasoned skin. Most standard cans of biscuits contain 8 biscuits, which quarters perfectly into 32 pieces for this recipe.
- 2 cups cooked chicken, shredded or diced (rotisserie works perfectly)
- 1 can (10.5 oz) cream of chicken soup – I recommend cream of mushroom as a delicious alternative
- 1/2 cup sour cream (or plain Greek yogurt for a lighter option)
- 1/2 cup milk (whole milk creates the richest sauce)
- 1 cup frozen mixed vegetables (peas, carrots, corn, and green beans) – In my experience, there’s no need to thaw these first
- 1 teaspoon garlic powder
- 1/2 teaspoon onion powder
- Salt and pepper to taste – I usually add about 1/2 teaspoon of each
- 1 can (16 oz) refrigerated biscuit dough, cut into quarters – My preference is Pillsbury Grands for extra fluffy results
- 1 cup shredded cheddar cheese (or mozzarella for a milder flavor) – Pro tip: freshly shredded melts better than pre-shredded
- 1 tablespoon melted butter, optional, for brushing on top
Step-by-Step Instructions
I recommend preheating your oven first so it’s ready when you finish assembling. In my experience, having everything prepped and ready makes the assembly incredibly quick.
Step 1: Preheat your oven to 350°F and lightly grease a 9×13-inch baking dish with butter or cooking spray. This prevents sticking and makes cleanup much easier later.
Step 2: In a large mixing bowl, combine the cooked chicken, cream of chicken soup, sour cream, and milk. Stir until smooth and creamy, then add the frozen vegetables, garlic powder, onion powder, salt, and pepper. Mix until everything is evenly distributed throughout the sauce.
Step 3: Cut each biscuit into quarters – this is crucial for even cooking and maximum sauce absorption. Add the biscuit pieces to the chicken mixture and fold them in, making sure each piece gets completely coated with the creamy sauce. Be careful not to overwork the dough or it may become tough.
Step 4: Pour the entire mixture into your prepared baking dish, spreading it out evenly with a spatula. Sprinkle the shredded cheese uniformly over the top, making sure to reach all the edges. The cheese will melt during baking and create a golden, bubbly top layer.
Step 5: Cover the dish tightly with aluminum foil and place it in the preheated oven. Bake for 20 minutes. This initial covered baking helps the biscuits cook through without over-browning the cheese on top.
Step 6: Remove the foil carefully (watch out for steam) and continue baking for an additional 10 to 15 minutes. The casserole is done when the biscuits are puffed and golden brown on top. To check doneness, insert a knife into a biscuit piece – it should come out without raw dough clinging to it. If the top starts browning too quickly before the biscuits are done, loosely tent with foil again.
Step 7: For an extra touch of richness, brush the top with melted butter immediately after removing from the oven. This adds flavor and gives the top a beautiful sheen. Let the casserole rest for about 5 minutes before serving – this allows the sauce to thicken slightly and makes it easier to scoop clean portions.
Perfect Pairings for Your Bubble Biscuit Bake
This hearty casserole pairs beautifully with lighter sides that balance its rich, creamy texture.
Simple Garden Salad: A crisp salad with mixed greens, cherry tomatoes, and cucumber dressed with a light vinaigrette cuts through the richness of the casserole while adding fresh vegetables to round out your meal nutritionally.
Roasted Green Beans: These add a wonderful crispy-tender texture contrast and bring a touch of elegance to this comfort food dinner. The slight char from roasting complements the creamy casserole perfectly. Try our Sheet Pan Sausage and Veggies cooking method for easy roasted vegetables.
Steamed Broccoli with Lemon: The bright, citrusy notes from fresh lemon juice enliven your palate between bites of the rich casserole, and the broccoli adds important nutrients and fiber. If you love broccoli, you’ll enjoy our Chicken Sausage and Broccoli Orzo.
Cranberry Sauce: This might seem unconventional, but the sweet-tart flavor works wonderfully alongside the savory chicken, especially during fall and winter months when you’re craving cozy comfort food.
Hearty Soup: For an extra filling meal, pair this with our Hearty Cheddar Garlic Herb Potato Soup for the ultimate comfort food combination.
Keeping Your Casserole Fresh
Store any leftovers in an airtight container in the refrigerator for up to 4 days. The casserole actually tastes even better the next day as the flavors continue to meld together overnight.
For reheating, microwave individual portions for 2 to 3 minutes, stirring halfway through to ensure even heating. If you’re reheating the entire dish, cover it with foil and warm in a 325°F oven for about 20 minutes until heated through. Pro tip: add a splash of milk before reheating to restore the creamy consistency if it seems dry.
This casserole freezes beautifully for meal prep. Let it cool completely after baking, then wrap tightly in aluminum foil and freeze for up to 2 months. Thaw overnight in the refrigerator before reheating. You can also substitute turkey for chicken, making this an excellent way to use up Thanksgiving leftovers. If you enjoy casseroles, check out our Dump and Bake Meatball Casserole for another easy option.
FAQs
Can I make this casserole ahead of time?
Yes, you can assemble the entire casserole up to 24 hours in advance. Keep it covered in the refrigerator, then add about 5 extra minutes to the covered baking time since it’s starting cold.
What if I don’t have refrigerated biscuit dough?
You can use homemade biscuit dough cut into pieces, or substitute with quartered dinner rolls. Frozen biscuits also work – just thaw them first and cut into quarters.
Can I add more vegetables to this recipe?
Absolutely! Diced bell peppers, mushrooms, or chopped spinach work wonderfully. Just make sure any fresh vegetables are pre-cooked or diced small so they soften properly during baking.

Chicken Bubble Biscuit Bake Casserole
Ingredients
Equipment
Method
- Preheat oven to 350°F (175°C). Lightly grease a 9×13-inch baking dish with butter or cooking spray.
- In a large mixing bowl, combine the cooked chicken, cream of chicken soup, sour cream, and milk. Stir until smooth and creamy, then add the frozen vegetables, garlic powder, onion powder, salt, and pepper. Mix until everything is evenly distributed.
- Cut each biscuit into quarters. Add the biscuit pieces to the chicken mixture and fold them in, making sure each piece gets completely coated with the creamy sauce.
- Pour the entire mixture into the prepared baking dish and spread evenly. Sprinkle shredded cheese uniformly over the top.
- Cover the dish tightly with aluminum foil and bake for 20 minutes.
- Remove foil and continue baking for an additional 10 to 15 minutes, until biscuits are puffed, golden brown, and cooked through. Check the center with a knife to ensure biscuits are fully cooked.
- Brush with melted butter if desired. Let rest for 5 minutes before serving to allow the sauce to thicken slightly.
Notes