
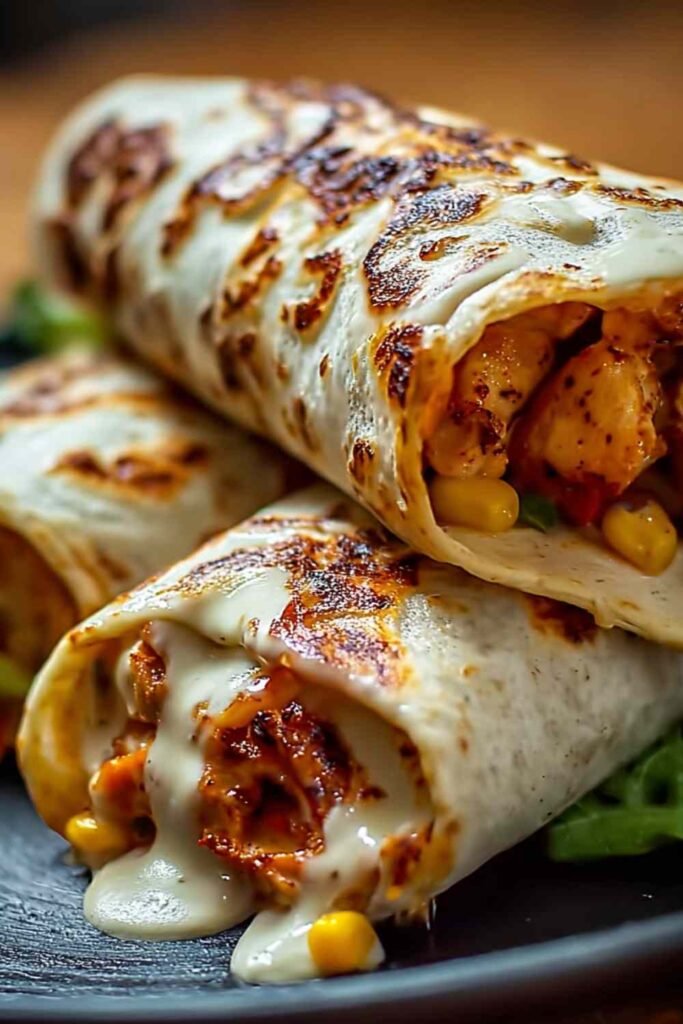
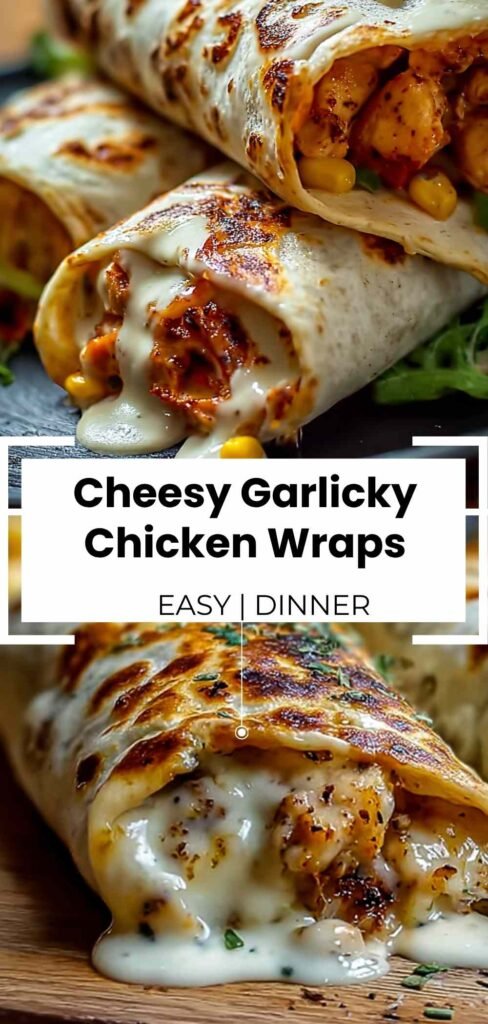
Cheesy Garlic Chicken Wraps are one of those recipes that saved me on countless busy weeknights when I needed something quick, satisfying, and guaranteed to please everyone at the table. These wraps combine tender chicken with creamy garlic sauce, melted cheese, and fresh vegetables in a way that feels indulgent but comes together in just 21 minutes.
Table of Contents
Ingredients for Cheesy Garlic Chicken Wraps
I always make sure my cream cheese is properly softened before starting because it makes mixing so much easier and creates that smooth, creamy texture everyone loves. For the chicken, I recommend using rotisserie chicken from your grocery store to save time, though any cooked chicken works beautifully. If you’re looking for another quick chicken recipe that uses similar ingredients, try my Creamy Garlic Parmesan Chicken Pasta for a different twist on garlic chicken.
- 2 cups cooked chicken (shredded)
- 1 cup shredded mozzarella cheese (I usually grab the pre-shredded kind for convenience)
- 4 oz cream cheese (softened to room temperature)
- 2 tablespoons mayonnaise (my preference is regular, not light, for better flavor)
- 3 cloves garlic (minced fresh, not jarred, makes a huge difference)
- 1 teaspoon Italian seasoning
- Salt and black pepper (to taste)
- 4 large flour tortillas (I recommend burrito-size for easier wrapping)
- 1 cup fresh spinach leaves (washed and dried)
- ½ cup diced tomatoes (seeds removed to prevent sogginess)
- ¼ cup sliced green onions (both white and green parts)
Step-by-Step Instructions
In my experience, letting your cream cheese sit out for about 30 minutes before starting makes the mixing process much smoother and prevents lumps in your filling.
Step 1: In a large mixing bowl, combine the shredded chicken, mozzarella cheese, softened cream cheese, mayonnaise, minced garlic, Italian seasoning, salt, and black pepper. Use a sturdy spoon or spatula to mix everything together until the mixture becomes smooth and creamy with no visible cream cheese lumps, about 2 minutes.
Step 2: Lay your four flour tortillas on a clean, flat surface. If your tortillas are cold from the refrigerator, warm them slightly in the microwave for 10 to 15 seconds to make them more pliable. Divide the chicken mixture evenly among the tortillas, spreading about ½ cup of filling down the center of each one, leaving about 2 inches of space on the sides. Pro tip: avoid overfilling, as this makes rolling difficult and can cause the wraps to burst open.
Step 3: Top each portion of chicken mixture with ¼ cup fresh spinach leaves, 2 tablespoons diced tomatoes, and 1 tablespoon sliced green onions. Distribute the vegetables evenly to ensure every bite has that fresh crunch.
Step 4: To wrap, fold in the left and right sides of the tortilla first, then tightly roll from the bottom edge toward the top, keeping the filling compact as you roll. Place each wrap seam-side down to help it hold together.
Step 5: If you prefer crispy wraps, heat a skillet over medium heat and place the wraps seam-side down. Cook for 2 to 3 minutes until golden brown, then carefully flip and cook the other side for another 2 to 3 minutes. Watch closely to prevent burning. For softer wraps, simply slice and serve immediately.
Perfect Pairings for Cheesy Garlic Chicken Wraps
These wraps taste incredible on their own, but pairing them with complementary sides creates a more balanced and satisfying meal.
Crisp Garden Salad: A fresh mixed greens salad with cucumbers, cherry tomatoes, and a light vinaigrette provides a refreshing contrast to the rich, creamy filling. The acidity from the dressing cuts through the cheese beautifully and adds nutritional balance with extra vegetables.
Cheesy Ranch Potatoes: My Cheesy Ranch Potatoes and Smoked Sausage make an excellent hearty side that complements the garlic flavors in these wraps while adding satisfying comfort food appeal to your meal.
Creamy Tomato Soup: A warm bowl of tomato soup alongside these wraps creates a comforting combination reminiscent of grilled cheese and soup. The acidity of the tomatoes balances the richness of the cheese and cream. For something heartier, try pairing with Hearty Cheddar Garlic Herb Potato Soup.
Tortilla Chips with Salsa: Keeping with the Tex-Mex theme, crispy tortilla chips with fresh salsa or guacamole add texture variety and allow family members to customize their meal. The fresh, zesty flavors contrast nicely with the creamy garlic filling.
Steamed Broccoli: For a lighter option, steamed broccoli with a squeeze of lemon provides a nutritious, fiber-rich side that doesn’t compete with the bold flavors of the wraps while keeping the meal balanced.
Keeping Your Wraps Fresh
Store assembled wraps in an airtight container in the refrigerator for up to 3 days. I recommend placing a paper towel between layers to absorb any excess moisture and prevent sogginess. If you made the crispy skillet version, note that they’ll soften in storage but can be re-crisped when reheating. For longer storage, wrap each one individually in plastic wrap and place in a freezer-safe bag for up to 2 months.
When reheating, I find that using a skillet over medium heat for a few minutes on each side brings back that wonderful crispy texture much better than the microwave. If you’re short on time, microwave on high for 45 to 60 seconds, though the tortilla will be softer.
These wraps are incredibly versatile and taste delicious served warm or at room temperature, making them perfect for packed lunches or picnics. You can easily double the recipe and keep the filling prepared in the fridge for quick assembly throughout the week. The filling alone stays fresh for up to 3 days when stored separately from the tortillas.
Frequently Asked Questions
Can I make these wraps ahead of time?
Absolutely! Prepare the chicken filling up to 2 days ahead and store it in the refrigerator. Assemble the wraps just before serving to prevent the tortillas from becoming soggy. If you need fully assembled wraps for meal prep, wrap them tightly in foil and store for up to 24 hours.
What can I substitute for cream cheese?
Greek yogurt or sour cream work well as lighter alternatives, though they’ll create a slightly tangier flavor. You can also use Neufchatel cheese for a lower-fat option that maintains the creamy texture.
How do I prevent the wraps from falling apart?
Make sure not to overfill your tortillas, and always place them seam-side down after rolling. Warming the tortillas slightly before assembling makes them more pliable and less likely to crack during rolling.

Cheesy Garlic Chicken Wraps
Ingredients
Equipment
Method
- In a large mixing bowl, combine the shredded chicken, mozzarella cheese, cream cheese, mayonnaise, minced garlic, Italian seasoning, salt, and black pepper. Mix until well combined and creamy with no visible cream cheese lumps.
- Lay out the flour tortillas on a clean surface. If cold, warm them in the microwave for 10 to 15 seconds to make them more pliable. Spread about ½ cup of the chicken mixture onto the center of each tortilla, leaving about 2 inches of space on the sides.
- Top the chicken mixture with fresh spinach leaves, diced tomatoes, and sliced green onions, distributing evenly.
- Fold in the sides of each tortilla, then roll it up tightly from the bottom to the top to form a wrap. Place seam-side down.
- If desired, heat a skillet over medium heat and place the wraps seam-side down. Cook for 2 to 3 minutes on each side until golden brown and crispy. For softer wraps, slice and serve immediately.
Notes


")