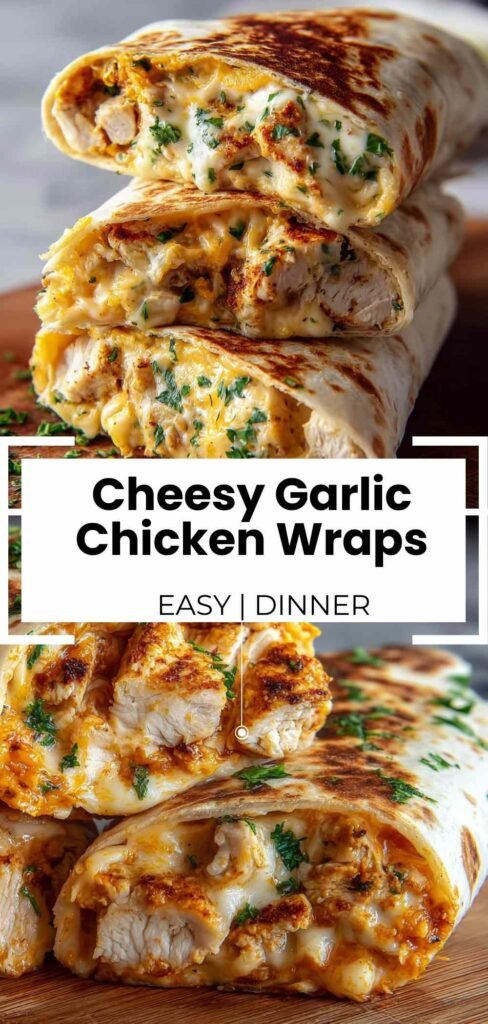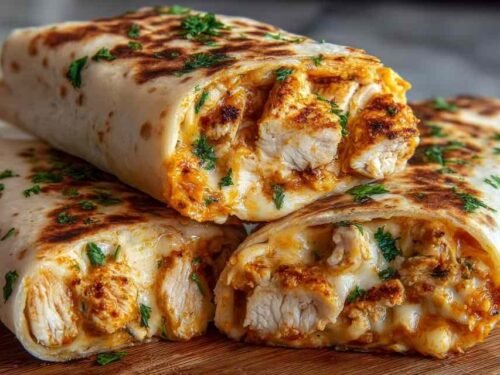
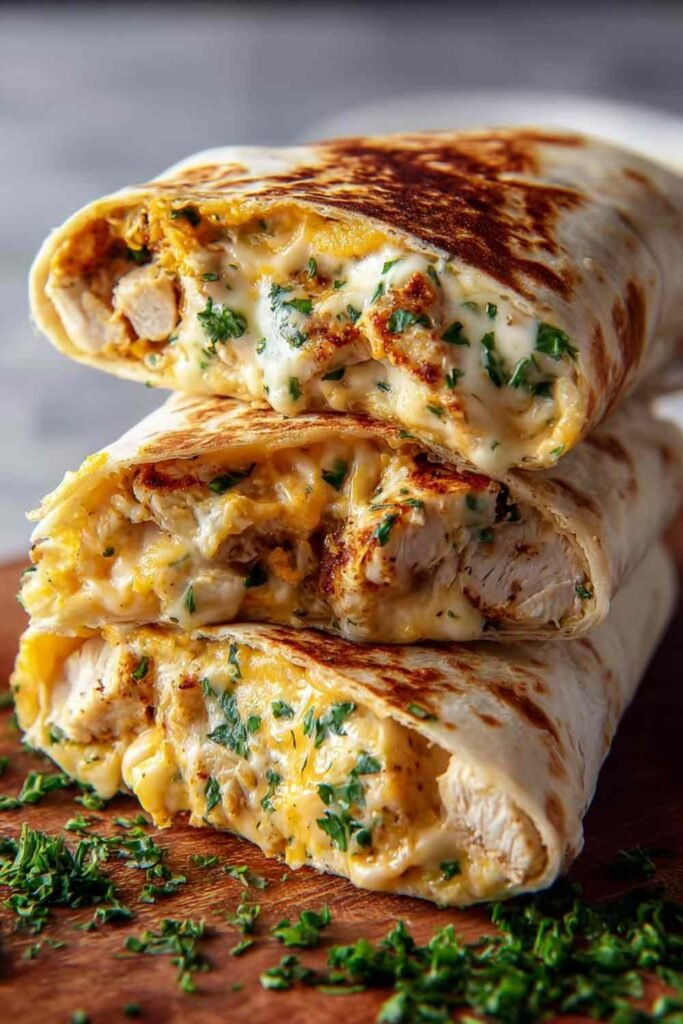
Nothing beats biting into a warm, melty cheesy garlic chicken wrap when dinner needs to happen fast. That first taste of juicy chicken mixed with gooey cheese and fragrant garlic is pure comfort. These wraps have become my family’s go-to meal when we need something quick, satisfying, and full of flavor.
Table of Contents
Ingredients for Cheesy Garlic Chicken Wraps
I always start with quality ingredients because they make all the difference in simple recipes like this one. Using pre-cooked rotisserie chicken saves precious time on busy nights, and fresh garlic beats the jarred stuff every single time. These wraps are incredibly forgiving, so feel free to adjust cheese types or add extra veggies based on what your family loves.
- 2 cups chicken breast (cooked, diced) – Using rotisserie chicken cuts your prep time significantly
- 4 cloves garlic (minced) – Fresh garlic creates the best flavor here
- 1 tablespoon olive oil
- 1 cup shredded mozzarella cheese – Whole milk mozzarella melts better than part-skim
- 1 cup shredded cheddar cheese
- 4 medium flour tortillas (burrito size works best)
- 1 tablespoon butter – Real butter creates the perfect golden crust
- 1 tablespoon fresh parsley (chopped, optional)
- Salt and black pepper to taste – About ½ teaspoon of each works well
Step-by-Step Instructions
Having everything prepped before you start makes the cooking process smooth and stress-free. This way, you can focus on getting that perfect crispy exterior.
Step 1: If you’re cooking chicken from scratch, season it lightly with salt and pepper, then bake at 375°F for 20-25 minutes or sauté in a pan until the internal temperature reaches 165°F. Dice into small, bite-sized pieces about ½-inch. Smaller pieces distribute more evenly in the wraps and make them easier to eat.
Step 2: Heat olive oil in a skillet over medium heat. Add the minced garlic and sauté for 45-60 seconds until it turns golden and releases its aroma. Watch it closely because garlic burns quickly and turns bitter.
Step 3: Toss the diced chicken into the pan with the garlic oil, stirring to coat every piece. Remove from heat and immediately stir in both cheeses while the chicken is still hot. The residual heat will start softening the cheese before assembly, creating that gooey texture we’re after.
Step 4: Lay a tortilla flat on your work surface. If your tortillas are cold and stiff, warm them for 10-15 seconds in the microwave to prevent cracking. Spoon about ½ cup of the cheesy chicken mixture into the center in a horizontal line. Fold the left and right edges in about 2 inches, then roll from the bottom up tightly, keeping tension as you roll.
Step 5: Melt butter in your skillet over medium heat. Place wraps seam-side down first and press gently with your spatula, applying just enough pressure to flatten slightly without squishing out the filling. This helps seal the seam. Cook for 2-3 minutes until golden brown and crispy, then carefully flip to cook the other side for another 2-3 minutes. The tortilla should be deep golden with some darker spots.
Step 6: Once all wraps are golden on both sides and you can see melted cheese at the edges, remove from the skillet and let them rest for 1-2 minutes. This brief waiting period allows the cheese to set slightly, making slicing cleaner and preventing burns. Sprinkle with fresh parsley if desired and serve immediately.
Perfect Pairings for Cheesy Garlic Chicken Wraps
These wraps are hearty enough to stand alone, but pairing them with the right sides elevates the entire meal and adds nutritional balance.
Fresh Green Salad: A crisp salad with mixed greens, cherry tomatoes, and a light vinaigrette cuts through the richness of the cheese and adds a refreshing contrast. The acidity in the dressing balances the savory garlic flavors perfectly. Try pairing these wraps with a simple protein-packed garlic cream chicken skillet for a complete garlic-lover’s feast.
Seasoned Potato Wedges: Crispy baked potato wedges seasoned with paprika and garlic powder complement the wraps beautifully. They add a satisfying crunch and make the meal more filling for hungry teenagers or active kids.
Tomato Soup: A warm bowl of tomato soup turns these wraps into the ultimate comfort meal. The soup works as both a side and a dipping sauce, and the combination reminds me of the classic grilled cheese and tomato soup pairing. If you love soup pairings, check out this high-protein butternut squash soup for a heartier option.
Coleslaw: Creamy or vinegar-based coleslaw adds crunch and freshness while providing extra vegetables. The cool, tangy slaw contrasts nicely with the warm, melty wraps.
Roasted Vegetables: Roasted broccoli, bell peppers, or zucchini bring color, nutrition, and a slightly sweet caramelized flavor that complements the savory garlic chicken.
Keeping Your Wraps Fresh
Store leftover wraps in an airtight container in the refrigerator at 40°F or below for up to 3 days. Separate them with parchment paper to prevent sticking. While these wraps are best enjoyed fresh, proper storage means you can enjoy them throughout the week.
When reheating, skip the microwave. Use a skillet over medium heat or pop them in a toaster oven at 350°F for 5-7 minutes. This method restores that crispy exterior that makes these wraps so satisfying. The microwave will work in a pinch, but the tortilla tends to get chewy rather than crispy.
For meal prep, you can assemble the wraps ahead of time and store them uncooked in the refrigerator for up to 24 hours. Just cook them when you’re ready to eat. You can also freeze cooked wraps for up to 2 months, then reheat them straight from frozen in the oven at 375°F for about 15 minutes.
FAQs
Can I use different types of cheese?
Absolutely! Pepper jack adds a nice kick, Swiss provides a milder flavor, and Monterey Jack melts beautifully. Just make sure at least one cheese has good melting properties for that gooey texture.
What if I don’t have cooked chicken?
Rotisserie chicken is the fastest shortcut, but you can also use canned chicken in a pinch or cook chicken breasts quickly in a skillet. Leftover grilled or baked chicken works perfectly too.
Can I make these wraps ahead for a party?
Yes! Assemble and cook the wraps, then slice them into pinwheels. Arrange on a platter and serve at room temperature as appetizers. They’re always a hit at gatherings.

Cheesy Garlic Chicken Wraps
Ingredients
Equipment
Method
- If cooking chicken from scratch, season lightly with salt and pepper, then bake at 375°F for 20-25 minutes or sauté until internal temperature reaches 165°F. Dice into small bite-sized pieces about ½-inch and set aside.
- Heat olive oil in a skillet over medium heat. Add minced garlic and sauté for 45-60 seconds until golden and fragrant, watching closely to prevent burning.
- Add diced chicken to the pan and toss with garlic oil to coat evenly. Remove from heat and immediately stir in both mozzarella and cheddar cheeses while chicken is hot. The residual heat will start softening the cheese.
- Lay a tortilla flat. If tortillas are cold, warm for 10-15 seconds in microwave to prevent cracking. Spoon about ½ cup of cheesy chicken mixture into the center in a horizontal line. Fold left and right edges in about 2 inches, then roll from bottom up tightly.
- Melt butter in skillet over medium heat. Place wraps seam-side down and press gently with spatula to flatten slightly and seal the seam. Cook for 2-3 minutes until golden brown and crispy, then carefully flip to cook the other side for 2-3 minutes.
- Remove wraps from skillet when golden on both sides with melted cheese visible at edges. Let rest for 1-2 minutes to allow cheese to set. Sprinkle with fresh parsley if desired and serve warm.
Notes